Showing posts with label Sewing. Show all posts

Wednesday, September 26, 2018

Bedroom Woodwork (with Regency Fashion!)

One of the last rooms to be finished in our fixer-upper is the master bedroom.  We had wallpapered the walls years ago (20 years?!), and that is in need of an update.  Paul had added window and door casings (we had the original design reproduced in oak).  But we didn't have baseboards in our room since the original pine ones (that were in horrible shape) were removed - 30 years ago - when we had gutted the upstairs.  Finally though, this summer, Paul installed the baseboards!  They are beautiful.  And this week the wallpaper is being changed.  So I am happy.

I happened to be dressed up for Book Club the day Paul finished them.  I was dressed in Regency for our book choice: Northanger Abbey by Jane Austen.  I wore my Michaelmas dress, that I finally finished (when I wore it for my Michaelmas Party, the "innards" weren't finished (seam finishes around the armholes, tacking down of the back fastenings, etc. and the hem was atrociously put in - I literally machine basted the worst-hem-ever.  Now all is finished and properly hemmed.  It was nice to wear the dress again, with my short stays, and have it be complete.  I also wore my Regency slippers from American Duchess.  I posed my foot by the new baseboards!

Northanger Abbey Dress

"Dashwood" Regency slippers from American Duchess

Close-up of the baseboards, with the outer corner blocks

Monday, January 1, 2018

Bedside Table Scarf Craft

A while back, I needed a quick nightstand scarf for our guest room (which was Robert's room, and he still stays here when he visits home - which will be tomorrow!!).  After Robert moved out to Portland, we decided to do some long needed renovations to this room that were too involved to do whilst someone was living in it.  These included:
  • Gutting, insulating, and wallboarding the closet (still in the works, but mostly done, no secret passageway yet though)
  • Revamping the electrical in the closet
  • Tearing down the ugly tile ceiling, replacing with wallboard
  • Fixing the venting system in the floor (the pros did that)
  • Removing the old wallpaper and painting
  • Sanding and refinishing the large dresser (but only the top of it; the rest was in pretty good condition)
  • New carpeting
We also found a cute bedside table and a "banker's lamp",  which this room was lacking the whole time Robert lived here (poor boy!).  This is what I wanted the nightstand scarf for.  I found and inexpensive, washable, cloth placemat at the nearby hardware store, and saw that I could easily cut it down and stitch it with very little time involved.

I measured the table top, and cut the placemat to size, keeping the existing hems on two sides 
and allowing seam allowance to turn under for a matching hem on the other two sides. 

New hem pinned and ready to sew.

The little table fits perfectly in this awkward little corner next to the bed.

I love the vintage feel of the banker's lamp.  The placemat will allow a water glass to sit without ruining the finish of the table.  Paul ran an extension cord unobtrusively for alarm clock or a cell phone charger.  There's a shelf below as well for books, tissues, etc.

Sunday, October 8, 2017

Michaelmas Party and New Harp Inaugural (Part II - The Dress and The Party!)

There were many moving parts to this party.  Besides the sewing, there was music to be learned and practiced, a hairstyle to be gotten, and food and decorations.  Paul, was an angel, and helped me so much with party set up and as our butler!


I had a special braided style done by Crowning Glory Braiding.

The table beforehand.
This time I have the right dimensioned tablecloth!

The new baby - cherry wood, with a cherry blossom motif

Here I am with the new harp.  
(Excuse the wrinkles in my dress - 
photo taken after I played for the ladies.)

And here are the Tea Ladies!
We had a lovely time.

Friday, October 6, 2017

Michaelmas Party and New Harp Inaugural (Part I - Sewing)

A week ago, on September 29th, I had a Michaelmas Party at my house.  Michaelmas is the Feast of Saint Michael the Archangel (one of my favorite saints, and I say the Saint Michael prayer often: see here).  I had often heard this holiday mentioned in Jane Austen movies, and never really knew what it was.  I was vaguely aware that it was near the end of September. I was wanting a theme for a dinner I was planning for my Tea Ladies.  It was going to be a special dinner, because I wanted to debut my new folk harp, a Dusty Strings FH36S, which was due to arrive at the beginning of September.

So I put together a Michaelmas Party with a Jane Austen/harp theme.  I decided to make a new gown.  I had a nice yellow fabric that I was actually intending for a test pattern that I am involved in evaluating, but I wanted to do something simpler, so I used La Mode Bagatelle's Regency Wardrobe Pattern which I have had in my stash.  I also needed a set of stays that I could wear and still play the harp in, so I bought a Short Stays pattern and the kit from Redthreaded.

The dress pattern: 
I used the crossover bodice with short sleeves

The Redthreaded kit:
I liked this kit, and the owner was very helpful with my questions!

The finished stays

The sewing was rather rushed; as usual I was running out of time, literally sewing up until a half hour before the party.  It is only by the Grace of God (and the fancy-schmancy invisible zipper foot I bought years ago, especially for my machine) that my invisible zipper went in without a hitch. (Yes, I was completely historically inaccurate and used a zipper.  This dress was meant to be a quick costume, not a faithful reproduction.)  The hem I put in is probably The Worst Hem Ever.  Machine sewn with a big basting stitch setting, and horrible on the inside, But it passed muster on the outside.  I will go back and re-do it in the future.  
Stay tuned for Part II - The Finished Dress and The Party!

Monday, February 6, 2017

Doctor Zhivago Inspired Edwardian Outfit

For Book Club this quarter, we read Doctor Zhivago by Boris Pasternak.  It is a long book, but good for cold winter days.  The novel is set in the years 1903-1940's, but the majority of the book takes place in 1903-1920's.  I was inspired to put together an Edwardian ensemble with a Russian flair.  I also channeled my inner geology geek putting together a little box of minerals as a prop (see this post for that).

I'll post from the inside-out:
  • Undergarments - If I had more time I would have finished my Edwardian Corset Cover that I had started so long ago.  So I just wore my older Edwardian undergarments.  I did make one tweak though - I had gotten my Erté Titanic Overbust corset from Period Corsets back in 2012.  It came with two sets of lacings for the back: one for the top-down and one from the bottom-up, meeting in the middle.  This makes it difficult though if one wants to lace themselves in.  Since I like to wear my corset during the week before an event to get acclimated to it, it is difficult when no one is home to help, as a two-laces corset requires (for the most part).  So I contacted a representative from Period Corsets, and she very kindly sent me a single long lace, which I re-laced my corset with.
  • Blouse - I purchased an Edwardian reproduction blouse from Cotton Lane on Amazon.  It's very pretty.  I ordered a larger size (I have football-player-shoulders), then took in the sides.
  • Skirt - Oh dear...this was a problem.  I used Rocking Horse Farm pattern #903 (Caution: Do Not Use This Pattern!  Ever!!) that was simply horrible.  The pattern lines for my size did not match up properly, I had to tape together the size small in order to see what they actually intended.  Even with that there was this odd extra fabric on the bottom front that was completely illogical.  There were no dots on the waistband pattern piece - needed for matching to the waistline of the skirt.  There was also a pleat marking missing.  The cut lines for it were on the pattern, and the markings were drawn on the suggested (tiny) pattern layout picture, but not on the pattern itself.  I spent a lot of hours trying to redraw, adjust, improvise.  The result was okay - from the outside.  On the inside there were problems.  It looked okay, but I was very frustrated with the lost time and aggravation of using a terrible pattern.  I will have to write a review on GBACG (Greater Bay Area Costuming Guild).  They have a Pattern Review section.  I so wish someone had reviewed this before and saved me the hassle of working with a dreadful pattern.   


  • Boots - The darling, lovely Manhattan Button Boots from American Duchess!  I love these.  Customer service here was also very helpful with the sizing.  My foot is long but narrow, and their shoes tend to run a bit large.  They gave me good advice on sizing and the boots fit perfectly.  Button hook needed! 

  • Hat - I bought a faux fur hat on sale from Fabulous Furs.  All of their products are faux.  This hat is very warm.  
  • Coat - my coat is a modern-day coat, but I was happy to be able to match the faux fur of the hat with that on the coat.  

Book Club was lots of fun.  The ladies liked my outfit, and even chuckled at my very bad, well-intentioned Russian accent.  I only said a few sentences in my fake-ey accent!  Hello in actual Russian, and then some key phrases I put together watching YouTube videos, and here's a funny way if you need a fake accent in a pinch: Go to Google Translate.  Type in the sentence you want in the first box, making sure you select English as the language to detect.  Once your sentence is complete, change the language in that same box to the language you want to hear, and click on the audio clickable at the bottom of that box.  You'll hear the English words, but with an accent of the language you changed the "Detect Language" to.  It doesn't work with all languages, but did pretty well for Russian.

Thursday, January 26, 2017

Disorganized Sewing/Robert's Room

I have two sewing projects on deck.  The trouble is that right now my home is not completely conducive to successful sewing.  Yesterday I wanted to get started tracing an Edwardian-era hobble skirt, and cutting bias strips to finally finish a quilt I started many, many years back. Step one was clearing off the dining room table - a Herculean task.  But it was done, wiped down, and worked commenced.  I was able to trace the skirt pattern yesterday.

The bias strips however, ran into a snag.  We have been, over the past, oh, six months or so, been doing some work on Robert's old room.  You see, Robert now lives in Portland, so the room is to be a guest room (and Robert's room when he comes to visit) and also a sewing room for me.  I've never had a sewing room before, and I long to have one.  But his closet was in need of repair (walls cracking, not insulated, cold), including a "secret passageway" that Tyler wants put in that leads from his closet to Robert's.  Fun, and has sort of a Narnia aspect to it (Mr. Tumnus?!).  So far the closet is insulated and has most of its wallboard.  All that remains is some electrical and the passageway door.  But we also needed to replace the ceiling in the room itself.  Right now the old ceiling is out, and 70% of the wallboard is up on the ceiling.  A paint job and new baseboards will follow (pre-stained oak this time, so all that needs to be done is the cutting and fitting).  But my sewing stuff is scattered to the four winds, including my iron.  Hence, the difficulty going forward with the bias strips.  So once I get all of my projects to the sewing stage, I will not have an optimal sewing space yet to do them.  Not really much different from when my sewing machine was in the dining room.

No one seems to know where the iron went.  To be honest, it is quite old, and I am tempted just to buy another.

My skirt project is for Book Club.  We are reading Doctor Zhivago.  I want to wear an Edwardian skirt and blouse ensemble, and I have my eye on an awesome faux fur Russian hat.  More on that in a future post.

Rocking Horse Farm #903 
Edwardian Hobble Skirt


My quilt - circa 1988

Sunday, April 10, 2016

Tackling The Mending


Today was the first Sunday in a long time where I was not working or otherwise engaged in the afternoon.  Tyler was at a friend's house, and Paul was (and is, still, at this moment) helping Robert with calculus.  I was inspired to take care of some new, and some long overdue, mending.  It started when I was ironing the creases out of the top sheet of a newer set of sheets I had gotten.  I did not notice when first using them that there was a defect in the stitching.  The zigzag that folded over the top part had caught some of the sheet.  This bothered me!  So I decided to fix it.  Paul also had requested that I fix his pants - the hem had come out from under the cuff.  While looking for some scrap muslin to test zigzag stitches on for the sheet, I uncovered a host of mending that has been patiently waiting for me.  Here's what I had:

  1. The top sheet
  2. A casual shirt that needed the neckline altered
  3. Paul's pants
  4. My dressy winter coat's two buttons
  5. A strap
  6. Two pair of Ty's pants that I had intended on turning into shorts (However, the Little Boy has grown so, these pants will never fit again, so they will be donated - less mending to do!)


First I sampled different sizes of zigzag, 
trying to duplicate the stitching on the sheet.


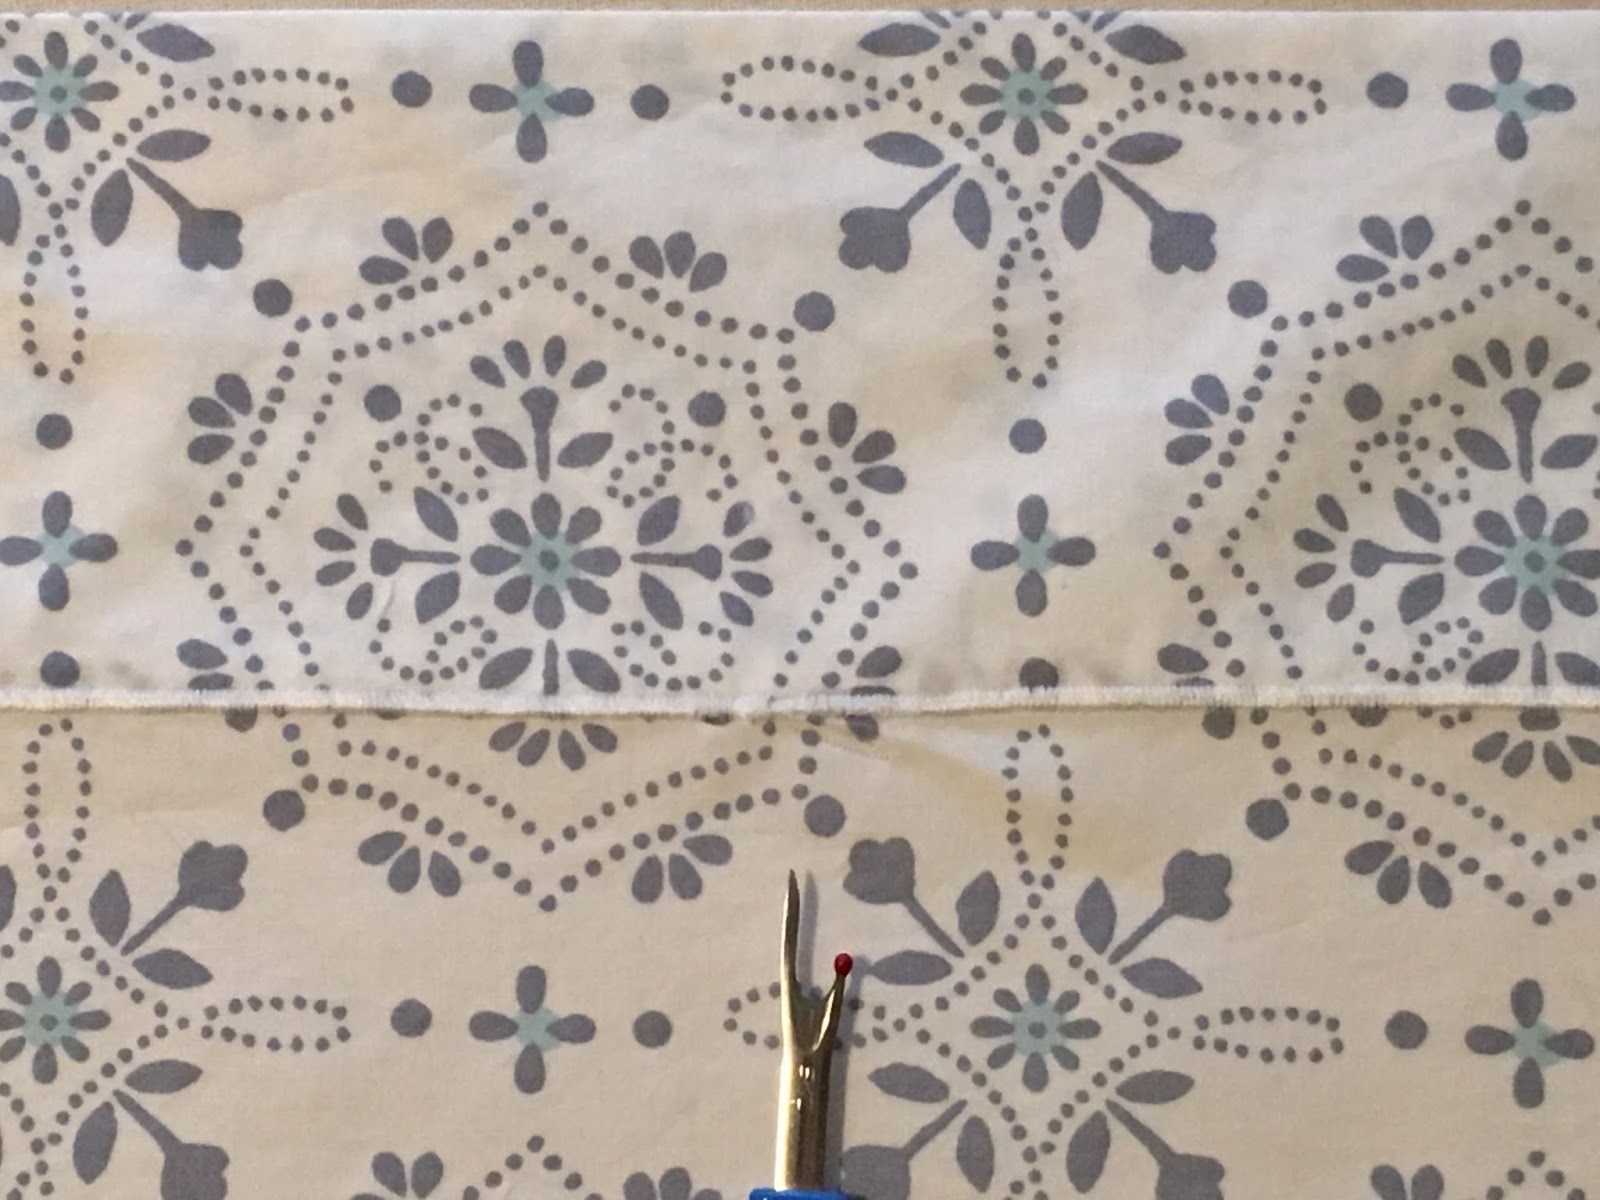
I did not take a picture before ripping out the defect, but you can see the crease and the old needle puncture marks in this photo after I had repaired it.  (In this close-up, the repair looks uneven, but from a few feet away, you cant't see.)

Here it is from a distance.  My ripper is pointing to the repaired area.

I bought this shirt on a sale, not realizing it how much of a boat-neck it had.  I cannot stand things against the front of my neck, should have realized before purchasing, but it was such a deal!  So I cut into the middle of the boat-neck, then turned down the front.  It is not a super alteration, but I can use this shirt for casual activities like gardening or cleaning.  

Paul's pants.

My old coat's buttons.  They had both fallen off.  I wear this coat to church every Sunday in cold weather.  It is a Halston that my friend found cheap in a thrift shop, gave to me because it was too big for her after all.  I have had it for at least five years, probably longer.  It is worn, but still looks nice, and keeps me toasty (very much needed in our area, especially this April, which has no resemblance to spring yet).  

The sewing machine all tucked away.  You'll note that it no longer resides in my dining room, rather Robert's unused room (although he will reclaim it for a month or so in late summer, before he moves to Portland for his graduate program).  

Wednesday, December 16, 2015

Found Objects - Kitchen Curtains

I had some lace curtains cluttering up my house, couldn't bear to throw them away.  It's a good thing I didn't.  I found a use for them in our new kitchen.  Although I like to have the windows bare because it lets in the maximum light in our north exposure windows, having the next door neighbors able to peer across at us was not pleasant (one can often find me in the kitchen in the morning still in my pajamas!).  So I hemmed these and hung them.  I actually prefer them at night, because all we would have were these two dark windows, rather stark with no light shining through.  This makes them inviting and homey, decreased sunlight notwithstanding.  


Monday, December 8, 2014

English Country Dancing

Last week Paul and I, along with our friend and her daughter (the daughter is in the process of choreographing a Regency dance for her school's production of Pride and Prejudice) went to St. Mark's Church in Evanston for their biweekly English Country Dancing.  I spontaneously decided to dress up.  My recent weight loss enabled me to fit back into my Regency stays, and a gown I made several years back.  I even found enough time to do a Regency hairstyle.

The dancing was fun.  We were all a bit confused, but the more experienced people helped guide us into the proper places.  I would like to do this again soon.  Below are some photos of me in my gown, and my hairstyle.  (Please excuse my wrinkled appearance; although I had ironed my dress prior to dressing, it got very wrinkled in the car ride to pick up our friends and drive to the church.)


Thursday, October 23, 2014

Experiencing the 1920's/Folkwear 264

Another Book Club costume!  This was from our late summer book in August.  We read An American Tragedy by Theodore Dreiser, which was written in 1925.  It is a bit out of the time frame we usually read (Victorian), but it was perfect for a summer setting.  I was Sondra Finchley for this gathering.  I made my dress using Folkwear's pattern 264.  


I liked the pattern; however, it is far too long.  Plus they were a little short on direction for making the section where the top meets the skirt at a point go in properly.  So I may re-do the attachment, and in the process shorten it. It's not a measure of simply turning up more of a hem - I lined the dress, and attached the skirt and its lining together at the hem line to make a smooth edge.  But all I will need to do is detach the skirt section from the top and restitch the bottom edge where the fabric and the lining form the hem about an inch or so above the current joining, making it a little shorter, and cutting off the excess.  Then I can rejoin skirt and top, fix the point and sew it in more professionally.  I also made the chiffon scarf.  I love chiffon!  It feels so soft, just perfect for spoiled Sondra to wear to an afternoon tea!


.

Sunday, September 8, 2013

Lady Audley's Secret

For my friend Colleen's Victorian Book Club (a quarterly meeting of eight ladies who meet to read and discuss Victorian literature), I was inspired to portray a character in the book we read, Lady Audley's Secret.  I did not want to be the main character (read the book to find out why!), rather, I was inspired by her step-daughter, Alicia.  Alicia was a very sympathetic character, as her father's second wife seemed to drive a rift between her and her father.  The fact that she was also a horsewoman fit right in with what was going on in my present day life, Tyler's horseback riding lessons.  Originally I planned on making a true reproduction riding habit bodice, but the pattern was delayed in shipping, and I didn't have much time to begin with.  So I decided to put together a faux riding ensemble that would capture the spirit of Alicia.

I have my Beatrix Jacket (made from the Sense & Sensibility pattern) and a modern black skirt that, when worn with a widening petticoat, looks somewhat authentic.  I had boots that looked like riding boots, a hat that just might look like a riding hat, and I bought a cheap riding crop (because, as you know, a good horsewoman must always be prepared for a ride!).  But I did not have a blouse that would work, and I wanted a new reticule.  I went blouse shopping and found this blouse, which does not look at all Victorian in the picture, but I rolled down and buttoned the sleeves, buttoned the buttons all the way up, added a brooch, and also sewed a little lace on the cuffs.  Voilà, a faux Victorian blouse!  For my reticule, I used this pattern, and just happened to find two different dotty fabrics at Vogue Fabrics that went with the blouse, which went together beautifully, making an adorable drawstring purse. 


Here I am, in all my faux glory, as Alicia:


Lady Alicia, her crop at the ready


Close-up 


The fabric of the dotty blouse


And the little dotty reticule


Saturday, August 24, 2013

Impressionism, Fashion, and Modernity - Costuming Adventure

My Tea Ladies and I went to the Impressionism, Fashion, and Modernity exhibit at Chicago's Art Institute.  If you haven't yet seen it - go.  It is amazing.  I understand now why one of my friends was brought to tears by it: upon entering the first room, you see a painting of a woman in a gown, across from it is an original gown which is strikingly similar (and in one case it is the actual gown that was worn for the painting) and incredibly beautiful.  Rooms and rooms with paintings and gowns, a costumer's delight.  This was one occasion where (for me) dressing up in costume was mandatory.  I worked very hard to complete a bustle gown using Truly Victorian patterns 208 and 400.

I got a lot of questions and comments.  Some thought I was an employee of the Art Institute.  Questions included: "How do you sit down in that dress?"  "Are you wearing a corset?" (I was).  Even, "How do you go to the bathroom?" (Really?!).  And, "Can I touch your bustle?" (asked by a woman, so I wasn't creeped out by it it, at least, not too much!).  I was asked to take photos with people outside the exhibit.  The funniest reaction was this: My friends and I were moving onto the next room.  We passed in front of a man and wife, I walked past first.  My friends told me after that the man had startled, then said to his wife, "It's like the Twilight Zone, like she walked out of the painting"!

The exhibit runs through the end of September.  Tickets purchased in advance is a good idea.  I would have posted a few photos from the exhibit, by it was forbidden.  Here are a couple of my dress:


Me with "Dad", also known as the painting American Gothic - my father looked almost exactly like the man in the painting!


Outside the exhibit.


A close-up of the bustle.  This was taken after the event, so sorry about the wrinkles.  I just love this bustle.


A better close-up, showing the clever sewing technique to achieve the bustle (along with the bustle pad worn underneath).  Truly Victorian patterns are some of the best historical patterns to work with!


Tuesday, August 13, 2013

A Peplum for my Bustle Dress

Here is one of the cutest parts of an historical outfit I am working on: the peplum to my 1871 bustle dress.  The pattern is from Truly Victorian: TV 400.


This will attach to the back of the bodice, and sit on top of the bustle.
(Note: I originally posted a photo of this with the wrong side up.  Oops!  Now corrected.)


Saturday, April 6, 2013

Scenes from Our Easter Celebration 2013

I had been working on a new toy for Tyler for the longest time.  It was an alligator, made from a 1950's pattern, that I first saw on Anna's blog.  I thought it was so cute!  The vintage pattern was easy to find on e-Bay.  Sewing it was a little more tricky.   But Tyler loved it!  It is such a happy time when a long-worked-on project is appreciated.   


The Gator


I left him out with Tyler's Easter basket after Mass.


Gator Wraslin'


We also made a lamb cake, using Great Grandmother's (Grammy's) pans.  Tyler and Da decorated.


And what would Easter be without the Easter Bunny Kitty?!  With creepy eyes!  (Kristin's Living Sculpture Artwork).