Showing posts with label Crafts. Show all posts

Monday, January 1, 2018

Bedside Table Scarf Craft

A while back, I needed a quick nightstand scarf for our guest room (which was Robert's room, and he still stays here when he visits home - which will be tomorrow!!).  After Robert moved out to Portland, we decided to do some long needed renovations to this room that were too involved to do whilst someone was living in it.  These included:
  • Gutting, insulating, and wallboarding the closet (still in the works, but mostly done, no secret passageway yet though)
  • Revamping the electrical in the closet
  • Tearing down the ugly tile ceiling, replacing with wallboard
  • Fixing the venting system in the floor (the pros did that)
  • Removing the old wallpaper and painting
  • Sanding and refinishing the large dresser (but only the top of it; the rest was in pretty good condition)
  • New carpeting
We also found a cute bedside table and a "banker's lamp",  which this room was lacking the whole time Robert lived here (poor boy!).  This is what I wanted the nightstand scarf for.  I found and inexpensive, washable, cloth placemat at the nearby hardware store, and saw that I could easily cut it down and stitch it with very little time involved.

I measured the table top, and cut the placemat to size, keeping the existing hems on two sides 
and allowing seam allowance to turn under for a matching hem on the other two sides. 

New hem pinned and ready to sew.

The little table fits perfectly in this awkward little corner next to the bed.

I love the vintage feel of the banker's lamp.  The placemat will allow a water glass to sit without ruining the finish of the table.  Paul ran an extension cord unobtrusively for alarm clock or a cell phone charger.  There's a shelf below as well for books, tissues, etc.

Sunday, October 8, 2017

Michaelmas Party and New Harp Inaugural (Part II - The Dress and The Party!)

There were many moving parts to this party.  Besides the sewing, there was music to be learned and practiced, a hairstyle to be gotten, and food and decorations.  Paul, was an angel, and helped me so much with party set up and as our butler!


I had a special braided style done by Crowning Glory Braiding.

The table beforehand.
This time I have the right dimensioned tablecloth!

The new baby - cherry wood, with a cherry blossom motif

Here I am with the new harp.  
(Excuse the wrinkles in my dress - 
photo taken after I played for the ladies.)

And here are the Tea Ladies!
We had a lovely time.

Friday, October 6, 2017

Michaelmas Party and New Harp Inaugural (Part I - Sewing)

A week ago, on September 29th, I had a Michaelmas Party at my house.  Michaelmas is the Feast of Saint Michael the Archangel (one of my favorite saints, and I say the Saint Michael prayer often: see here).  I had often heard this holiday mentioned in Jane Austen movies, and never really knew what it was.  I was vaguely aware that it was near the end of September. I was wanting a theme for a dinner I was planning for my Tea Ladies.  It was going to be a special dinner, because I wanted to debut my new folk harp, a Dusty Strings FH36S, which was due to arrive at the beginning of September.

So I put together a Michaelmas Party with a Jane Austen/harp theme.  I decided to make a new gown.  I had a nice yellow fabric that I was actually intending for a test pattern that I am involved in evaluating, but I wanted to do something simpler, so I used La Mode Bagatelle's Regency Wardrobe Pattern which I have had in my stash.  I also needed a set of stays that I could wear and still play the harp in, so I bought a Short Stays pattern and the kit from Redthreaded.

The dress pattern: 
I used the crossover bodice with short sleeves

The Redthreaded kit:
I liked this kit, and the owner was very helpful with my questions!

The finished stays

The sewing was rather rushed; as usual I was running out of time, literally sewing up until a half hour before the party.  It is only by the Grace of God (and the fancy-schmancy invisible zipper foot I bought years ago, especially for my machine) that my invisible zipper went in without a hitch. (Yes, I was completely historically inaccurate and used a zipper.  This dress was meant to be a quick costume, not a faithful reproduction.)  The hem I put in is probably The Worst Hem Ever.  Machine sewn with a big basting stitch setting, and horrible on the inside, But it passed muster on the outside.  I will go back and re-do it in the future.  
Stay tuned for Part II - The Finished Dress and The Party!

Tuesday, February 7, 2017

A Small Collection of Minerals from the Urals (in a Wooden Box)

I liked the book Doctor Zhivago.  At times, it got a little long, and I must admit - the politics got somewhat tiresome.  But it has to be said that the descriptions in the book are stunning. The way the author described food (especially the food), sunrises, landscapes, etc.  Truly poetic.  One part that caught my imagination early on was a part when one of the characters, Misha, an eleven-year-old boy, was on a train where a tragedy had occurred (a suicide). "Misha was examining a small collection of minerals from the Urals in a wooden box - the dead man's last gift."  This little boy made me think of Tyler, and I set out to find one small wooden box of Russian minerals; this would be part prop for Book Club, part gift to Tyler.  I found a lovely wooden box on Etsy.  Perfect: small, six little compartments, beautifully made.  

Then the real fun began at Dave's Rock Shop in Evanston.  The people there are very helpful, and did not seem to mind my rather odd request: six minerals from Russia, that will fit in this box, very pretty ones if you please.  So, I searched through and found some gorgeous specimens.  The only hang up was the last one.  I wanted to have a bright color, but there were no other colorful Russian minerals that I liked.  I broke protocol, and substituted a nice Orange Calcite from Mexico to liven it up.   


To complete the box, I found an old-fashioned looking map of the Urals, copied it and secured it to the inner lid of the box.  I made a key listing the minerals, may eventually put this in place of the map.  But I wanted the Russian map because I brought the box with me to Book Club, where we discussed Doctor Zhivago, on loan for a day prior to being given to Tyler, who will be the new curator of this tiny collection.  


Monday, February 6, 2017

Doctor Zhivago Inspired Edwardian Outfit

For Book Club this quarter, we read Doctor Zhivago by Boris Pasternak.  It is a long book, but good for cold winter days.  The novel is set in the years 1903-1940's, but the majority of the book takes place in 1903-1920's.  I was inspired to put together an Edwardian ensemble with a Russian flair.  I also channeled my inner geology geek putting together a little box of minerals as a prop (see this post for that).

I'll post from the inside-out:
  • Undergarments - If I had more time I would have finished my Edwardian Corset Cover that I had started so long ago.  So I just wore my older Edwardian undergarments.  I did make one tweak though - I had gotten my Erté Titanic Overbust corset from Period Corsets back in 2012.  It came with two sets of lacings for the back: one for the top-down and one from the bottom-up, meeting in the middle.  This makes it difficult though if one wants to lace themselves in.  Since I like to wear my corset during the week before an event to get acclimated to it, it is difficult when no one is home to help, as a two-laces corset requires (for the most part).  So I contacted a representative from Period Corsets, and she very kindly sent me a single long lace, which I re-laced my corset with.
  • Blouse - I purchased an Edwardian reproduction blouse from Cotton Lane on Amazon.  It's very pretty.  I ordered a larger size (I have football-player-shoulders), then took in the sides.
  • Skirt - Oh dear...this was a problem.  I used Rocking Horse Farm pattern #903 (Caution: Do Not Use This Pattern!  Ever!!) that was simply horrible.  The pattern lines for my size did not match up properly, I had to tape together the size small in order to see what they actually intended.  Even with that there was this odd extra fabric on the bottom front that was completely illogical.  There were no dots on the waistband pattern piece - needed for matching to the waistline of the skirt.  There was also a pleat marking missing.  The cut lines for it were on the pattern, and the markings were drawn on the suggested (tiny) pattern layout picture, but not on the pattern itself.  I spent a lot of hours trying to redraw, adjust, improvise.  The result was okay - from the outside.  On the inside there were problems.  It looked okay, but I was very frustrated with the lost time and aggravation of using a terrible pattern.  I will have to write a review on GBACG (Greater Bay Area Costuming Guild).  They have a Pattern Review section.  I so wish someone had reviewed this before and saved me the hassle of working with a dreadful pattern.   


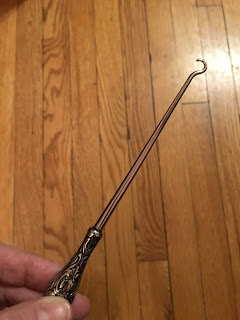
  • Boots - The darling, lovely Manhattan Button Boots from American Duchess!  I love these.  Customer service here was also very helpful with the sizing.  My foot is long but narrow, and their shoes tend to run a bit large.  They gave me good advice on sizing and the boots fit perfectly.  Button hook needed! 

  • Hat - I bought a faux fur hat on sale from Fabulous Furs.  All of their products are faux.  This hat is very warm.  
  • Coat - my coat is a modern-day coat, but I was happy to be able to match the faux fur of the hat with that on the coat.  

Book Club was lots of fun.  The ladies liked my outfit, and even chuckled at my very bad, well-intentioned Russian accent.  I only said a few sentences in my fake-ey accent!  Hello in actual Russian, and then some key phrases I put together watching YouTube videos, and here's a funny way if you need a fake accent in a pinch: Go to Google Translate.  Type in the sentence you want in the first box, making sure you select English as the language to detect.  Once your sentence is complete, change the language in that same box to the language you want to hear, and click on the audio clickable at the bottom of that box.  You'll hear the English words, but with an accent of the language you changed the "Detect Language" to.  It doesn't work with all languages, but did pretty well for Russian.

Thursday, January 26, 2017

Disorganized Sewing/Robert's Room

I have two sewing projects on deck.  The trouble is that right now my home is not completely conducive to successful sewing.  Yesterday I wanted to get started tracing an Edwardian-era hobble skirt, and cutting bias strips to finally finish a quilt I started many, many years back. Step one was clearing off the dining room table - a Herculean task.  But it was done, wiped down, and worked commenced.  I was able to trace the skirt pattern yesterday.

The bias strips however, ran into a snag.  We have been, over the past, oh, six months or so, been doing some work on Robert's old room.  You see, Robert now lives in Portland, so the room is to be a guest room (and Robert's room when he comes to visit) and also a sewing room for me.  I've never had a sewing room before, and I long to have one.  But his closet was in need of repair (walls cracking, not insulated, cold), including a "secret passageway" that Tyler wants put in that leads from his closet to Robert's.  Fun, and has sort of a Narnia aspect to it (Mr. Tumnus?!).  So far the closet is insulated and has most of its wallboard.  All that remains is some electrical and the passageway door.  But we also needed to replace the ceiling in the room itself.  Right now the old ceiling is out, and 70% of the wallboard is up on the ceiling.  A paint job and new baseboards will follow (pre-stained oak this time, so all that needs to be done is the cutting and fitting).  But my sewing stuff is scattered to the four winds, including my iron.  Hence, the difficulty going forward with the bias strips.  So once I get all of my projects to the sewing stage, I will not have an optimal sewing space yet to do them.  Not really much different from when my sewing machine was in the dining room.

No one seems to know where the iron went.  To be honest, it is quite old, and I am tempted just to buy another.

My skirt project is for Book Club.  We are reading Doctor Zhivago.  I want to wear an Edwardian skirt and blouse ensemble, and I have my eye on an awesome faux fur Russian hat.  More on that in a future post.

Rocking Horse Farm #903 
Edwardian Hobble Skirt


My quilt - circa 1988

Thursday, December 8, 2016

Anniversary Clock Repair

This fall found Paul taking on a new skill to add to his arsenal: Clock Repairman!  

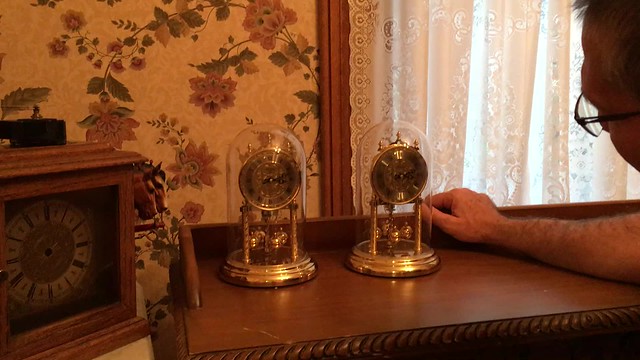
Three clocks demanded his attention all at once, sort of.  Paul had received an Anniversary Clock from work one year.  Note: the name "Anniversary Clock" comes from the fact that supposedly one only has to pay attention to it once every 400 days, although 365 days would suffice, hence, the anniversary portion of the name.  Official definition: "Unlike a regular pendulum clock, the Anniversary Clock keeps time with a mechanism called a torsion pendulum. This is a weighted disk or wheel, often a decorative wheel with 3 or 4 chrome balls on ornate spokes, suspended by a thin wire or ribbon called a torsion spring (also known as "suspension spring"). The torsion pendulum rotates about the vertical axis of the wire, twisting it, instead of swinging like an ordinary pendulum."  Unfortunately the suspension wire had weakened and over-twisted, rendering the timekeeping useless.  I thought it was just broken, so searched and found one on eBay for cheap.  Guess what - same problem (it would have been nice of the seller to mention that, but like I said - it was cheap.  

So we started looking into this.  Paul took one of the clocks apart carefully, and saw what we needed.  Unlike others of this ilk, these particular ones used a plastic end suspension wire, almost impossible to find.  however, we did find one shop online that carried it, Timesavers. The part is a Hermle 400-Day Suspension Unit.  We ordered, and Paul was able to fix them.

At the same time, the clock Paul made for his mom many years ago also needed repair.  The parts for that (the box where the hand-moving mechanism is) were easier to find, although it took forever to arrive. We got these parts at Clockparts.


Side by side suspension wires.
The on on the right is the broken, twisted one.  
Note the plastic ends.  

The suspension from the inside

Close-up of the bottom plastic end inside the suspension


A Clock Video


Part finally arrived, Mom's clock fixed!

Monday, November 28, 2016

Advent Begins

“Advent, like its cousin Lent, is a season for prayer and reformation of our hearts. Since it comes at winter time, fire is a fitting sign to help us celebrate Advent…If Christ is to come more fully into our lives this Christmas, if God is to become really incarnate for us, then fire will have to be present in our prayer. Our worship and devotion will have to stoke the kind of fire in our souls that can truly change our hearts. Ours is a great responsibility not to waste this Advent time.”
— Fr. Edward Hayes
On Saturday, Julie and Tyler went to Queen of All Saints for an Advent wreath crafting.  The result is beautiful.  We lit the first candle this evening.  In the background is a 2016 Valrhona chocolate Advent calendar that we bought at Trader Joe's.  Tyler is very much looking forward to December 1st, when he can open the first flap.

"Rejoice! Rejoice! Emmanuel 
Shall come to thee, O Israel."

Friday, February 26, 2016

Found Object - Salad Bowl

This wonderful salad bowl was made by my hubby Paul when he was in Shop Class in high school.  It is beautifully made.  He also made the salad serving set as well.  Many years back though, before we had a kitchen with storage, we used to keep the bowl on top of the fridge with a lot of other stuff.  Then one day it got jostled and fell off.  It broke clean in two, much to our despair.  It went into the basement for repair, and Paul got it glued back together.  It needed refinishing though: filling of any small remaining cracks, a good sanding, re-staining parts, and plenty of polyurethane to fill gaps and give it a solid waterproof coat.  But there were just so many other projects and so much to do, that it sat and sat and sat...

Then once we had made some good headway into the kitchen remodel, we stumbled upon it on a shelf in the basement.  How many years had it been?!  Paul got going on it again, working carefully and methodically to restore it.  Coat after coat of poly, until it was just right.

Paul's Signature on the bottom of the bowl 
from when he first made it- 4/20/72.

How lovely to serve salad in such a bowl!

Wednesday, December 16, 2015

Found Objects - Kitchen Curtains

I had some lace curtains cluttering up my house, couldn't bear to throw them away.  It's a good thing I didn't.  I found a use for them in our new kitchen.  Although I like to have the windows bare because it lets in the maximum light in our north exposure windows, having the next door neighbors able to peer across at us was not pleasant (one can often find me in the kitchen in the morning still in my pajamas!).  So I hemmed these and hung them.  I actually prefer them at night, because all we would have were these two dark windows, rather stark with no light shining through.  This makes them inviting and homey, decreased sunlight notwithstanding.  


Thursday, November 19, 2015

My Downton Abbey Dinner

At last I have the blog post of my Downton Abbey Dinner!  It was a lovely evening.  My family was amazing in the help and acting they provided.  Of course, there were a few snafus, but we worked around them, and the evening went smoothly.

I'll start from the beginning, showing how the evening progressed.

The Arrival:

Our "butler" stood outside on the front porch to welcome guests.  We had the American flag on our flagpole above, but we also hung the Union Jack on the porch near the butler.

Paul played Carson.  However, a small snafu detained him from the initial answering of the doorbell. (There was a mistake with our entree - not enough was made as we ordered!  He and Robert ran out to get the revised order right before the evening started.)  However, our butler-in-training, Mini-Me Carson (Tyler) subbed for Carson, and did a brilliant job of it ("Might I take your coat, mum?" and "Here is your champagne punch, mum" in a very authentic-sounding British accent!)

Mini-Me Carson (Ty) and Lady Mary (Julie)


Then it was time for the first game.  I spent a lot of time preparing what I called "Downton Abbey Easter Eggs" or "Hidden in Plain View".  This was where I placed reproductions of items or beings that appeared in the show out in the various rooms, along with other antique-like items.  The guests then needed to figure out which of the many items that were in and around the rooms were actually related to the show.  This was probably the most enjoyable aspect of the planning.  I needed to make some of the reproductions, which really tapped into my creative side.  

Game One:
While the ladies hunted for the objects, I played three harp pieces for them: Adagietto by Damase, Nadir's Song from The Pearl Fishers by Bizet, and an arrangement of Downton Abbey Suite by Lunn that my harp teacher and I adapted for harp.  I am wearing my Downton Abbey Dress that I had made previously for another event.  

This was one of two favorite Easter Eggs that I placed out.  I found instructions for this craft on this website, although we altered the bell to be an actual doorbell (non-functioning, just for show).  Paul made this for me.  I did the spray painting, but he did the rest, carefully pre-drilling holes for the doorbell, the clip, and the nail that went into the wall, and adhering the name plate to the wood.  It is still hanging on the wall, and I think I will keep it there, periodically changing the note to the butler as the occasion suggests.  

Here were some other Easter Eggs, see if you know which episode they are from and what was going on in the show around them: a bar of soap, a (reproduction) painting by Piero Della Francesca, a telegram (see below for text), a letter opener, a syringe, some letters, a train ticket (also see below), a fan, and a poster about a vaudeville act.  

Telegram

Train Ticket.  
This was my second favorite Easter Egg.  I made it using Word, and it was not easy!  I only had the photo below to go on, but it was really fun trying to duplicate it.  


This telephone was not originally intended to be an Easter Egg; I bought it to add to the ambiance, but many ladies guessed it, and it did appear in the show after all.  


Isis.  Tyler inherited her once the party was over. 


Baby Marigold.  
My doll is always in my parlor, but I added a silk marigold bouquet to hint at her identity.


Then it was time for dinner.  My faithful staff (Paul, Kristin, Robert, and Tyler) worked behind the scenes.  Lady Mary (Julie) dined with us, amusing us Violets and Isobels with her youthful company.  We played another game between the first course (split pea soup) and the second (Asparagus Salad with Champagne-Saffron Vinaigrette, recipe here) called Match the Quote (link here).

The Dinner:

The dinner table.  Julie had rescued me from the wrong tablecloth. (I discovered that day that I had ordered the wrong size; she ran out that afternoon and bought me one that would fit our table with both leaves in.)

A brass servant's bell brought our staff to our table.  We had pesto ravioli (Maggiano's, who made good on the whoops regarding mistake on the size tray we wanted in a most generous way) and Walnut Carrots with Honey Glaze (recipe here).


Between dinner and dessert we played our last game, Downton Abbey Trivia (link here).  Our dessert was Chocolate Toffee Mini-Trifles (recipe here).   And then it was time to depart.  

The Ending:


My wonderful "staff".  Tyler, Robert (the footman Albert), and Carson (who also acted as a footman during dinner - gasp! and poured the wine).  Mrs. Patmore (Kristin) was too shy for a photo.  


The Aristocratic Ladies (Violets, Isobels, and Lady Mary).  Note the hats and tiaras.

And one more with Mini-Me Carson.

We all had so much fun with this.  It was a lovely evening, and in spite of the effort, I am looking forward to our next big event.  It was just so nice to travel into the past!

Monday, March 16, 2015

How To Make A Majora's Mask


Tyler wanted a Majora's Mask, from the video game, for one of his Christmas presents this past Christmas.  We foolishly thought we could simply go online and buy one.  No.  The only ones available were art pieces that cost hundreds of dollars.  So, the combined talents of engineer Paul and artist Julie, brought forth a miracle.  I wanted to post how they did it, so that other parents, futilely searching for an affordable Majora's Mask, might be able to follow this plan and make one of their own for their younguns.  

For supplies, they started with a trip to Hobby Lobby.  They spent about $34. I have listed the Hobby Lobby sku numbers after each item.  They began with the mask base (white butterfly mask, sku 925149).  Paul trimmed down the bottom, getting rid of the part that goes by the mouth and lower cheeks (see inside of finished mask, at end of this post).  


To get the proper dimensions of the mask, he found a pdf of Majora's Mask and sized it up to the size he wanted for the final mask size.  He then cut the shape of the outer mask from a 5mm white foam sheet (sku 336339) using this resized pdf, and glued it to the mask base (basically a heart shape with points along the edges - be sure to have the points as part of the 5mm white foam, you will color them later) using foam glue (sku 377473).  He and Julie then cut pieces of 2mm colored foam (sku 570192) in the shapes as indicated on the pdf (with the exception of two small areas on the lower portion of the mask which were either left as white foam or colored green with Sharpie, see details at end of post). The layers were: base mask, white foam, purple foam, red foam, then smaller pieces of purple, orange, yellow, and green for the forehead pieces and the eye sockets.


White foam

Colored foam


Foam glue

Julie then painted and Sharpied any colors not already there in foam.  She used white acrylic for white areas (sku 337170), old gold acrylic paint for the upper points on top of head and just below the sides of the eyes, and the triangles above the eyes (sku 344960).


Sharpie markers (sku 603068) were used for the lower points along the sides of the mask, along with the green areas near the green points.


Inside of mask: white foam heart shape with points along top and sides, glued to mask base

The finished mask

Some details on the finished mask: Most of it is made of foam layered on foam, with gold and white paint and Sharpie markers coloring in the white foam not covered by the colored foam.  The only white foam exposed is the white near near the green points.  The green and black there is Sharpie marker on the white foam.  The white accent just under the nose is painted on the red foam.  All of the points are the white foam colored with either gold paint or Sharpie.  The white accents on the forehead are white acrylic paint, and the triangles on the forehead are gold acrylic paint.  Note also that the eyes on the Majora's Mask pattern are very wide-set.  Your child will not be able to see out of the eyeholes that far apart.  Paul simply cut the eye openings in the foam as a more oval shape so Tyler could see out the mask.

This was a *bit* labor-intensive, truly a labor of love, especially for Julie who was up late several nights artistically painting in the various areas of the mask needing paint.  Stay tuned for a future post of Ty dancing in his mask!

P.S. If you have any questions about how Paul and Julie did this, leave a question in the comments section; we'll try to help!